Quality Roof Installation Starts With the Right Local Team A roof installation is more than a home improvement project. It is a long-term investment in protection, comfort, curb appeal, and property value. Whether you are replacing an aging shingle roof, upgrading a flat roof, or planning a full tear-off, the quality of the installation matters just as much as the materials you choose. What Makes a Quality Roof Installation? It starts with careful planning, professional execution, and a complete system approach that suits your property and local climate. For homeowners and property owners in Westchester County, NYC, and the Bronx , American Star Contractor Corp provides professional roof installation services designed around careful preparation, dependable workmanship, and premium roofing systems. If you have been searching for high quality roof installation near me, it is important to know what separates a rushed job from a roof built to perform. Why Installation Quality Matters Even the best roofing materials can fail early if they are not installed correctly. Poor fastening, missing flashing, inadequate ventilation, weak underlayment, or skipped decking repairs can lead to leaks, premature wear, and costly repairs. A quality roof installation should create a complete roofing system, not just a new outer layer. That means every component must work together, including: Roof decking Underlayment Drip edge Flashing Starter shingles or base materials Shingles, flat roofing membrane, or metal panels Ridge caps or termination details Ventilation components Sealants and waterproofing details When evaluating contractors, look for quality roofing services that explain the entire process clearly. A reliable installer should not simply quote the visible surface. They should assess the structure underneath, identify problem areas, and recommend the right solution for your roof type and property. American Star Contractor Corp for New York Area Roof Projects There are two distinctly separate regional companies operating under the “American Star” brand, so it is important to choose the right one for your location. If your project is in New York, Westchester County, NYC, or the Bronx , you are likely looking for American Star Contractor Corp. American Star Contractor Corp offers high quality roof installation services, including full tear-offs, roof replacements, new roof installations, architectural shingle systems, and flat roof installations. As GAF Certified residential roofers, the team follows professional installation standards and uses premium materials to help create roofing systems built for local weather conditions. Their process commonly includes: Removing old shingles or roofing materials Inspecting the wood decking below Repairing or replacing damaged decking when needed Installing new underlayment Adding drip edges Installing proper flashing at vulnerable points Completing the roof with durable shingles or flat roofing materials Cleaning the job site after installation This complete-scope approach is one of the most important signs of professional roof installation. A Practical Roof Installation Guide for Homeowners If you are planning a roof replacement, the following roof installation guide can help you understand what to expect and what to ask before work begins. 1. Start With a Complete Roof Evaluation A quality contractor should inspect more than the surface. They should look for signs of water damage, soft decking, missing flashing, ventilation issues, sagging areas, and improper previous repairs. This first step is essential because hidden problems can affect the performance of the new roof. Installing new materials over damaged wood or poorly prepared surfaces can shorten the roof’s lifespan. 2. Choose Materials That Match the Property Different roofing systems work better for different buildings. Architectural shingles are a popular choice for many residential homes because they offer durability and an attractive dimensional appearance. Flat roofs require specialized materials and installation techniques to manage drainage and prevent water intrusion. For some properties, metal roofing may also be considered. When evaluating metal roof installation quality, pay close attention to panel alignment, fastening methods, flashing details, expansion allowances, and waterproofing around penetrations. A metal roof must be installed with precision to avoid leaks, oil canning, and long-term performance problems. 3. Confirm Full Tear-Off Details A full tear-off allows the roofing team to remove old materials and inspect the decking. This is often the best way to identify damage that would otherwise remain hidden. It also gives the new roof system a cleaner, stronger foundation. Before hiring a contractor, ask whether the proposal includes removal of existing materials, disposal, decking inspection, underlayment, flashing, and cleanup. 4. Pay Attention to Flashing and Edges Many roof leaks begin around chimneys, walls, skylights, valleys, vents, and roof edges. Proper flashing is one of the clearest signs of a reliable roof installation. Drip edges also matter. They help guide water away from fascia boards and roof edges, reducing the risk of rot and moisture damage. If a contractor overlooks these components, the roof may look finished while still being vulnerable. 5. Review Ventilation Needs Ventilation helps regulate heat and moisture in the attic area. Poor ventilation can contribute to mold, ice damming, shingle deterioration, and higher energy demands. A qualified roofing contractor should consider intake and exhaust ventilation as part of the overall roofing system. Roof Installation Checklist Use this roof installation checklist when comparing proposals or reviewing a completed project: Has the old roofing material been fully removed when required? Was the decking inspected before new materials were installed? Were damaged wood sections repaired or replaced? Was new underlayment installed properly? Were drip edges included at roof edges? Was flashing replaced or properly integrated? Are shingles or roofing materials aligned evenly? Are fasteners placed correctly, not overdriven or underdriven? Are valleys, penetrations, and transitions sealed correctly? Was ventilation reviewed? Was the property cleaned after installation? Did the contractor explain warranty and maintenance basics? A contractor who can walk you through these details is more likely to deliver expert roofing solutions instead of a quick surface-level job. Affordable Roof Installation Without Cutting Corners Many homeowners want affordable roof installation, but the lowest price is not always the best value. A roof that is installed incorrectly can lead to leaks, interior damage, mold concerns, and another replacement sooner than expected. A
Category Archives: Blog
Is Roof Maintenance Worth the Cost?
Roof maintenance is a crucial aspect of homeownership. It ensures the longevity and safety of your property. But Is Roof Maintenance Worth the Cost? Yes—especially when you compare routine expenses to major repairs. Many homeowners overlook regular roof maintenance. They often underestimate its importance—and the true cost of roof maintenance—until problems arise. This can lead to costly repairs or even full replacements. Preventative maintenance can save you money in the long run. It helps avoid unexpected expenses and extends the life of your roof. Understanding roof maintenance cost is essential. Different roof types and locations can influence the overall cost of roof maintenance significantly. Professional services, like those from American Star Contractor (often searched as “american star contractor”), offer peace of mind. They provide thorough inspections and maintenance plans tailored to your needs, with transparent roof inspection costs. In this article, we will explore the cost benefits of roof maintenance. We will also discuss how it can protect your investment. Why Roof Maintenance Matters: Protecting Your Investment Regular roof maintenance is essential for safeguarding your home and enhancing its value. A well-maintained roof protects your home from the elements. It’s your home’s first line of defense. Ignoring maintenance can lead to major issues. Water damage, mold growth, and structural concerns are common. Preventing these issues is easier and cheaper than fixing them. A proactive approach ensures small problems don’t become costly emergencies. Routine inspections can detect leaks or broken shingles early. Repairing these issues in a timely manner saves money. Investing in roof maintenance can also increase property value. A pristine roof boosts curb appeal and reassures potential buyers. It reflects a well-cared-for property. Consider these key benefits of regular roof maintenance: Extends the lifespan of your roof Prevents costly repairs or replacements Increases property value Don’t underestimate the role of maintenance in roof longevity. It’s a wise investment with substantial returns. Understanding Roof Maintenance Costs: What to Expect The cost of roof maintenance, or average roof maintenance cost, varies widely. Factors such as material, location, and roof complexity play crucial roles. Let’s explore what impacts these costs. Materials like shingles or metal dictate the maintenance needs. Shingle roofs might require more frequent patching. Metal roofs, however, typically demand less attention. Location significantly influences labor rates and materials. In some areas, seasonal weather changes require more upkeep. Local building standards can also affect pricing. Complexity and accessibility of your roof also matter. Roofs with steep pitches or multiple levels may have higher maintenance costs. Safety precautions and additional labor add up. Common expenses in roof maintenance include: Regular inspections to identify potential issues Cleaning gutters to prevent water damage Sealing and coating for protection against elements Additionally, consider the cost of minor repairs. Fixing leaks early can prevent costly damage later. Never underestimate the value of addressing small issues promptly. Professional maintenance services might be more expensive initially. Yet, they offer expertise and assurance. Hiring experts can prevent larger expenses in the future and clarify typical roof inspection costs. Factors That Influence the Cost of Roof Maintenance Various factors influence roof maintenance costs. Understanding these can help plan and budget effectively for future expenses. First, the type of roofing material greatly affects costs. Asphalt shingles, for example, may require different care than metal or tile roofs. Each material has unique maintenance requirements. Weather conditions in your area are another consideration. Regions with heavy snow or rain may see higher maintenance needs. Extremes in weather can accelerate wear and tear. Maintenance frequency also impacts overall expenses. Regular upkeep prevents larger issues but adds to annual costs. Finding a balance between frequency and necessity is essential. Consider the age and condition of your roof. Older roofs often need more attention to keep them in shape. As roofs age, they become more susceptible to damage. Lastly, the choice of contractor plays a role. Rates can vary between companies due to experience, reputation, and location. Always compare multiple quotes before deciding. Type of roofing material Weather impact Maintenance frequency Age and condition of the roof Choice of contractor Comparing Maintenance Costs by Roof Type Roof maintenance costs vary widely depending on the roof type. Understanding these variations helps when budgeting for roof care. Flat roofs often require more frequent inspections. Drainage issues can lead to serious damage if unchecked. Regular maintenance ensures proper drainage and prevents water accumulation. Metal roofs usually incur lower maintenance expenses. They are durable and less prone to typical roofing issues. However, they still need periodic checks for corrosion and loose fasteners. In contrast, tile roofs demand careful attention to prevent cracks. Replacing broken tiles can be time-consuming and costly. This type may require more frequent visual inspections. Green roofs are trendy but expensive to maintain. They involve not just structural components but also plant health. Regular trimming and irrigation add to maintenance costs. Finally, asphalt shingle roofs are common and relatively affordable to maintain. Yet, they may require more frequent repairs due to weather impact. Flat Roof: Frequent inspections for drainage Metal Roof: Low maintenance, check for corrosion Tile Roof: Inspect for cracks, replace tiles Green Roof: Maintain plants and structural health Asphalt Shingle: Affordable but frequent repairs Flat Roof Installations: Unique Maintenance Needs Flat roofs present unique challenges due to their design. Drainage is a crucial component, needing regular checks. These considerations apply both to existing roofs and to flat roof installations. Without proper drainage, water can pool and cause damage. Regular roof inspections mitigate these risks, preventing leaks and deterioration. Additionally, flat roofs may require re-sealing more often. This maintains their waterproof integrity, especially in rainy climates. Check and maintain drainage systems Regular inspections for potential leaks Consider periodic re-sealing Metal Roof Maintenance Cost: What’s Different? Metal roofs are known for durability, influencing their maintenance costs. They resist many common roofing issues, reducing maintenance frequency. Despite this, they still need occasional attention. Checking for loosened fasteners and possible rust spots is important. Over time, weather exposure can lead to rust. Routine inspections identify these early, making
What Siding Material Is Best For New York Weather?
New York homes deal with a demanding mix of weather: freezing winter temperatures, snow and ice, spring rain, humid summers, strong wind, and fast seasonal temperature swings. That combination makes siding more than a cosmetic upgrade. The right exterior cladding helps protect the wall assembly, reduce maintenance, improve curb appeal, and prevent moisture problems before they become expensive repairs. Many homeowners ask, “What siding material is best for New York weather?” when planning a project. For many homeowners comparing the best siding material for New York weather 2026 , the strongest overall answer is fiber cement siding, especially when it is installed with proper flashing, a water-resistive barrier, and manufacturer-approved clearances. However, the “best” choice depends on your budget, home style, maintenance expectations, and whether your property is exposed to coastal moisture, tree cover, heavy shade, or high wind. Why New York Weather Is Hard on Siding The best house siding material for New York climate has to perform through more than one type of stress. A siding product that handles summer heat but struggles with winter expansion may not be ideal. A material that looks beautiful but absorbs moisture can become a maintenance burden if it is not sealed correctly. New York’s climate concerns include: Freeze-thaw cycles: Moisture can enter small gaps, freeze, expand, and stress siding, trim, caulk lines, and fasteners. Heavy rain and wind-driven moisture: Rain does not always fall straight down. In storms, it can push behind poorly detailed siding. Snow and ice buildup: Lower wall sections, corners, and areas near rooflines can stay wet longer. Humidity and shade: Moisture-prone areas can encourage paint failure, mildew staining, and wood decay when maintenance is ignored. Heat and UV exposure: South- and west-facing walls may fade or expand more than shaded elevations. Storm-related impact: Branches, debris, and hail can damage thinner or more brittle materials. NYSERDA notes that heavy rain events and heat waves have become more frequent and longer in New York, which makes moisture management and heat durability important siding considerations. (nyserda.ny.gov) New York’s residential code guidance also emphasizes that exterior wall coverings are part of the weather-resistant exterior envelope and includes requirements related to wind resistance and water-resistive barriers. (dos.ny.gov) The Short Answer: Best Overall Siding for New York Homes If you want one practical recommendation, fiber cement is usually the best siding material for homes in New York climate because it offers a strong balance of durability, weather resistance, design flexibility, and lower maintenance compared with natural wood. Fiber cement is especially well suited for homes in White Plains, Port Chester, Dobbs Ferry, Tarrytown, and many other communities throughout Westchester County and the broader Tri-State area because it can handle cold, moisture, seasonal movement, and traditional Northeast home styles. James Hardie describes its HardieZone system as “Engineered for Climate,” with HZ5 products designed for climates with freezing temperatures, snow, ice, and seasonal temperature variation. (jameshardie.com) That said, not every homeowner needs the same solution. Premium vinyl, insulated vinyl, engineered wood, cedar, metal, and composite siding can all be appropriate in specific situations. The smartest choice is the one that matches your home’s exposure, budget, design goals, and long-term maintenance plan. Top Durable Siding Options for New York 1. Fiber Cement Siding Fiber cement is one of the most recommended durable siding options for New York homes. It is made from cement-based materials with reinforcing fibers, giving it a solid feel and strong resistance to common exterior threats. Why it works well in New York: Resists rot better than traditional wood. Handles moisture well when installed correctly. Offers strong dimensional stability in seasonal weather. Provides a classic clapboard, shingle, or panel look. Can suit colonial, Cape Cod, Tudor, farmhouse, and modern homes. Offers better fire resistance than many combustible siding options. James Hardie states that its fiber cement products are water resistant, do not attract pests, and are noncombustible or Class A fire rated when tested under ASTM E84. (jameshardie.com) The same source notes that HZ5 products are designed to resist shrinking, swelling, and cracking after wet or freezing conditions. (jameshardie.com) Things to consider: Fiber cement is heavier than vinyl and requires experienced installation. Cutting, fastening, flashing, clearances from roofs or grade, and caulking details matter. Poor installation can shorten the life of an otherwise excellent product. It also typically costs more upfront than standard vinyl siding, but many homeowners choose it for long-term value and appearance. Best for: Homeowners who want the best balance of durability, curb appeal, and long-term performance. 2. Insulated Vinyl Siding Vinyl siding remains one of the most common new york siding choices because it is cost-effective, widely available, and low maintenance. Insulated vinyl adds a foam backing that can improve rigidity and create a straighter finished appearance. Why it works well in New York: Usually more budget-friendly than fiber cement. Does not require painting. Available in many colors and profiles. Resists moisture because it does not absorb water like wood. Can be a practical option for rental properties or budget-conscious renovations. Things to consider: Vinyl expands and contracts with temperature changes, so it must be nailed properly and allowed to move. If it is fastened too tightly, panels may buckle. In very cold weather, lower-grade vinyl can become more vulnerable to cracking from impact. Manufacturer and industry installation guidance emphasizes proper water management and installation to achieve intended performance. (vinylsiding.org) Best for: Homeowners looking for a lower-maintenance and more affordable siding replacement. 3. Engineered Wood Siding Engineered wood siding offers the warm, textured appearance of natural wood with enhanced manufacturing designed to improve durability. It is often lighter than fiber cement and can be easier to cut and install. Why it works well in New York: Attractive wood-like appearance. Strong impact resistance in many product lines. Good option for farmhouse, craftsman, and contemporary designs. Often available in longer boards, which may reduce seams. Can be factory finished for consistent color. LP Building Solutions describes its engineered wood siding as designed for freeze-thaw conditions and notes that extreme temperature
How Much Does Emergency Roof Repair Cost In NY
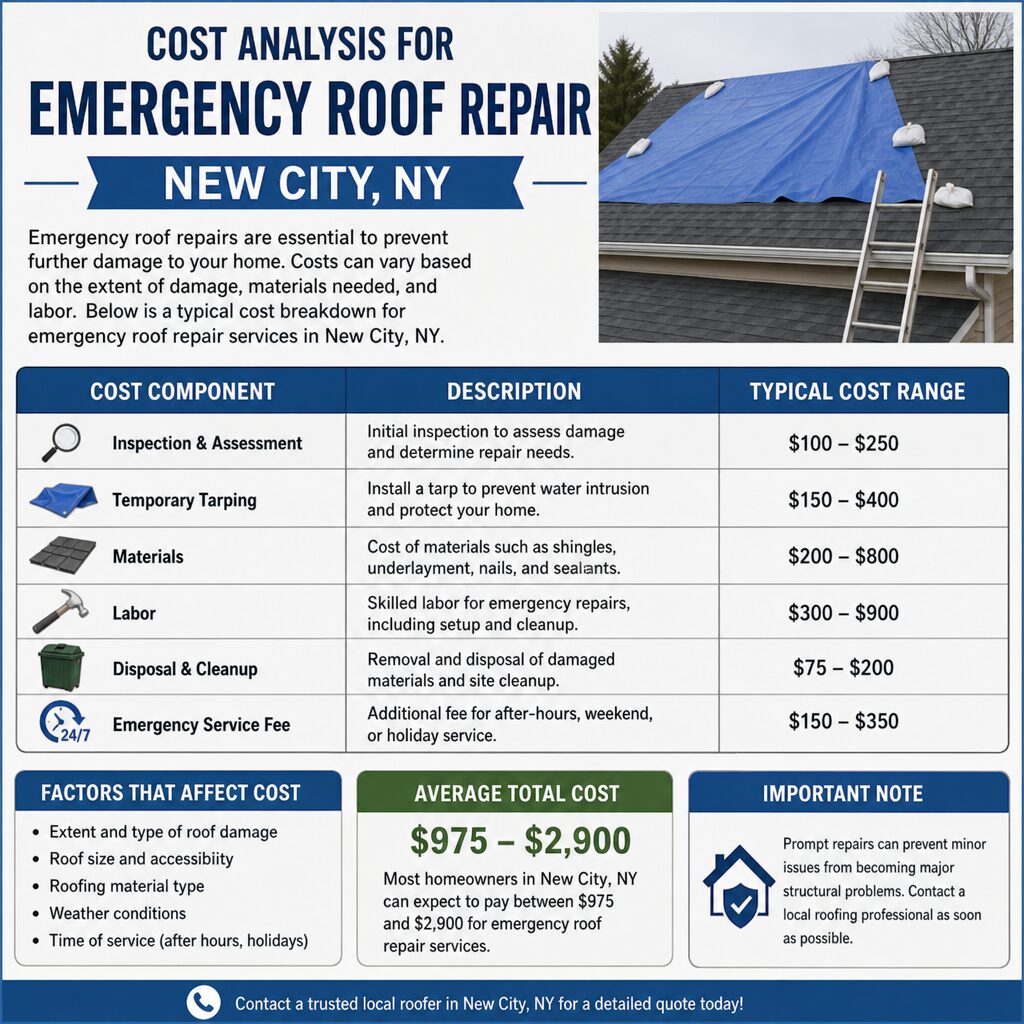
When a roof emergency strikes, quick action is crucial. Homeowners in New City, NY, often face unexpected roof issues. These can range from leaks to storm damage. Understanding the costs involved in emergency roof repair is essential. It helps homeowners budget and make informed decisions. Below, we break down Emergency roof repair cost in NY (New City, NY): pricing, estimates, and factors. Emergency roof repair costs can vary widely. Factors like damage severity and roofing materials play a role. In New City, NY, repair costs can be higher than the national average due to local labor rates and material costs within the New York roofing market. This guide will explore emergency roof repair costs. We’ll cover roof repair pricing, roof repair estimates, and key factors affecting costs. Understanding Emergency Roof Repair in New City, NY Emergency roof repair is a vital service for homeowners facing sudden roofing issues. In New City, NY, these problems arise due to weather or structural failures. Timely intervention prevents further damage to your home and reduces the roof repair cost over time. Common emergency situations include leaks, missing shingles, and storm damage. These require immediate attention to safeguard your property. Ignoring these issues can lead to costly repairs later. When seeking emergency roof services, you have numerous options available. Many local companies offer 24/7 emergency roofing services to address urgent needs. It’s wise to have a plan in place for unexpected roof issues and NY roof repairs after major storms. Key considerations for homeowners include: Response time and availability Credentials and experience of contractors Costs and roof repair estimates for repairs Understanding these aspects will aid in efficient and effective emergency roofing solutions. Average Emergency Roof Repair Cost in NY: What to Expect The cost of emergency roof repair in New City, NY, varies widely. It often depends on the damage’s extent and required materials. On average, homeowners can expect to spend between $300 and $1,500. Your roof repair cost will ultimately reflect materials, labor, and timing. Specific repairs or material choices may push prices higher. Quick repairs can sometimes reduce overall costs by preventing further damage. Pricing transparency is key to avoiding unexpected expenses, so ask contractors for clear roof repair pricing. Cost factors include labor rates, which may exceed national averages. Higher local living costs contribute to this trend. Additionally, some companies charge premiums for after-hours service. When planning your budget, consider potential costs from common repairs: Leak repairs Shingle replacement Storm damage mending Understanding these costs helps you prepare financially for unforeseen issues. Key Factors Affecting Emergency Roof Repair Pricing Several factors determine the cost of emergency roof repairs. Understanding these can help homeowners manage their budgets effectively. New City, NY’s unique climate and market conditions also play a role. Together, these variables determine roof repair pricing during urgent situations. Factors include the type of roofing material, damage severity, and location on the roof. The design of the roof and its accessibility can significantly influence the labor required. Additional costs may arise from specific damage types. Here are the primary factors affecting repair costs: Type of roofing material Severity and location of damage Roof size, design, and accessibility Labor costs and after-hours premiums Reviewing these elements can clarify potential expenses. Planning ahead allows for better financial preparedness. It is crucial to maintain clear communication with contractors to understand pricing structures. Type of Roofing Material The roofing material greatly influences repair costs. Different materials have varying price points and difficulty levels for repairs. For instance, slate or tile can be expensive to repair. Each material has distinct characteristics that affect repair time and cost: Asphalt shingles: generally lower cost Metal roofs: moderate expense, longer life Slate/tile: higher cost due to complexity Choosing durable materials might reduce future emergency repair needs. Consider the balance between aesthetics, longevity, and costs when selecting materials. Severity and Location of Damage The severity and specific location of the damage impact repair difficulty and price. Damage near complex structures like chimneys or skylights can be more costly. Severe damage often requires more extensive labor and resources. Key factors influencing costs: Proximity to roof features (chimneys, skylights) Extent of the structural damage Type of emergency (leak, storm damage) Prompt repairs can prevent further structural issues and control repair costs. Assessing the damage accurately ensures effective budgeting for repairs. Roof Size, Design, and Accessibility Roof size and design influence both labor and material costs. Larger roofs naturally incur higher expenses. Designs with complex structures may demand specialized labor. Important considerations include: Roof dimensions Complexity of design (multi-level, pitched) Ease of access for repair crews Ensuring safe and easy access can reduce labor time and costs. Discuss accessibility issues with your contractor to anticipate potential challenges. Labor Costs and After-Hours Premiums Labor costs in New York often exceed national averages due to a higher cost of living. Emergency repairs sometimes need immediate attention, incurring after-hours premiums. Additional factors affecting labor costs: Local labor rates Urgency and time of service (night/weekend rates) Availability of skilled workers When hiring, consider the potential extra charges for off-hour repairs. Prioritize contractors with clear pricing to avoid unexpected expenses. Common Types of Emergency Roof Repairs Various types of roof damage necessitate immediate attention. Understanding these common emergencies helps in recognizing urgent situations. This knowledge can prompt timely action to minimize further damage. Typical emergency roof repairs include: Leaking roofs due to weather or aging Missing or damaged shingles from high winds Storm damage leading to water penetration Fallen tree branches causing structural harm Addressing these issues quickly is crucial. Leaks, for instance, can lead to significant water damage. Replacing missing shingles prevents moisture from entering the home. Storms or fallen branches may require structural assessments and repairs. Regular inspections can mitigate these emergencies. How to Get Accurate Roof Repair Estimates in NY Getting precise estimates ensures you know what to expect financially. Start by contacting several contractors to compare pricing. Multiple quotes help identify fair market rates and avoid overpriced services. When requesting roof repair estimates,
Financing Options In New York For Major Roof Renovations

Living in New York Mills, Minnesota, comes with many perks: a tight-knit community, beautiful rural landscapes, and a peaceful Midwestern lifestyle. However, it also means facing some of the harshest weather conditions in the country. From heavy winter snowfall and ice dams to severe summer thunderstorms and hail, your roof takes a constant beating. When the time comes to replace or heavily repair your roof, the financial burden can feel overwhelming. If you are facing a deteriorating roof, you are likely wondering how to afford the project. Fortunately, there is a wide array of Financing options for major roof renovations in New York Mills, Minnesota. Whether you need an entirely new roofing system or just extensive repairs to get through the next winter, understanding your financial avenues is crucial. This comprehensive guide will walk you through everything you need to know about funding your roofing project, from state-sponsored programs to traditional loans, contractor plans, and emergency assistance. Understanding the Scope of Your Roofing Project Before you can choose the right financial path, you need to understand the financial reality of the project. The cost of professional roof replacement in Westchester, varies widely based on several factors, including the size of your home, the pitch of your roof, and the materials you choose. On average, homeowners in Otter Tail County might spend anywhere from $8,000 to $20,000 for a standard asphalt shingle roof, while metal or composite roofing systems can push those figures higher. Factors influencing this cost include: Material choice: Asphalt is cost-effective, whereas standing seam metal offers longevity at a premium price. Labor rates: Local contractor rates and the complexity of the installation. Tear-off and disposal: Removing old layers of shingles and disposing of them properly adds to the labor and dumpster fees. Structural repairs: If your roof decking is rotting due to water infiltration, replacing the plywood will increase the baseline cost. Because this is a substantial investment, exploring multiple financing options for roof renovations is the smartest way to protect your home without draining your life savings. Dealing with Immediate Crises: Emergency Repairs and Insurance Sometimes, a roof replacement isn’t a planned upgrade but a sudden necessity. A massive summer hailstorm or a collapsed section due to heavy snow requires immediate action. Navigating the Insurance Process If your roof was damaged by an “act of God” like wind, hail, or fallen trees, your homeowner’s insurance should be your first line of defense. Understanding the storm damage insurance claim settlement process is critical to minimizing your out-of-pocket expenses. Document the Damage: Take clear photos of the damage from the ground. Do not climb onto a damaged roof. Mitigate Further Loss: Insurance companies require you to prevent further damage. This is where knowing how to pay for emergency roof repairs, like emergency tarping, comes in handy. You can usually pay a local contractor to tarp the roof, and the insurance company will reimburse this expense as part of the claim. File the Claim: Contact your agent immediately. Meet the Adjuster: Have your chosen local roofing contractor present when the insurance adjuster inspects the roof. They can advocate on your behalf to ensure all damage is noted. Understand ACV vs. RCV: Your settlement will depend on whether your policy covers Actual Cash Value (depreciated value) or Replacement Cost Value (the cost to buy a brand new roof). Filling the Insurance Gap Even with great insurance, you will still be responsible for your deductible, which can range from $1,000 to $5,000 or more. Furthermore, if the insurance company only pays for a partial replacement, you might need roof repair financing to cover the difference so you can upgrade the entire roof at once. Traditional Banking and Credit Union Options If insurance isn’t an option because your roof has simply reached the end of its natural lifespan, traditional lending institutions offer some of the most reliable home improvement loans. HELOC vs Personal Loan for Roof Replacement When visiting a bank, you will likely choose between a secured loan and an unsecured loan. Understanding the debate between a HELOC vs personal loan for roof replacement is vital. Home Equity Line of Credit (HELOC): How it works: A HELOC utilizes home equity financing. It functions like a credit card backed by the value of your home. You are approved for a maximum limit and can draw from it as needed. Pros: Typically offers much lower interest rates than unsecured loans because your home acts as collateral. You only pay interest on the amount you actually draw. Cons: The application process can be lengthy, requiring a home appraisal. Furthermore, because it uses your house as collateral, failure to repay could result in foreclosure. Personal Home Improvement Loans: How it works: These are unsecured loans. You receive a lump sum upfront and pay it back in fixed monthly installments over a set period (usually 3 to 7 years). Pros: Fast approval times. No home appraisal required, and your property is not put up as direct collateral. Cons: Because they are riskier for the lender, they come with higher interest rates. Local Credit Unions Residents of New York Mills should not overlook the power of local banking. Seeking local credit union home improvement financing is often preferable to dealing with massive national banks. Local credit unions in Otter Tail County are deeply invested in the community and often offer more flexible underwriting standards and lower fees. They understand the local real estate market and the necessity of winterizing homes in Minnesota. A Note on Interest Rates When securing these loans, keep an eye on the interest rates for Minnesota roofing loans. Rates fluctuate based on the Federal Reserve and the broader economy. To secure the best rate, ensure your credit score is as high as possible before applying, and always shop around to compare APRs (Annual Percentage Rates) from at least three different lenders. State and Federal Government Loan Programs Homeowners in New York Mills have access to excellent government-backed renovation loan programs designed specifically to keep
Types Of Roofing Services Professional Contractors Offer In New York City
When it comes to maintaining a home, the roof is a critical component. It protects against the elements and enhances curb appeal. Professional roofing contractors offer a variety of services to meet homeowners’ needs. These services range from installation to maintenance and repair. Below are the types of roofing services professional contractors offer homeowners, spanning residential roofing, roof installation, roof repair, roof maintenance, and roof inspections. Choosing the right roofing solutions starts with understanding what’s included. Understanding these services can help homeowners make informed decisions. It ensures their roofs remain in top condition for years. Roof installation is a fundamental service, providing a strong foundation for any home. Regular maintenance and timely repairs can extend a roof’s lifespan significantly. Emergency services are crucial after severe weather events. They provide quick solutions to prevent further damage. By exploring the types of roofing services available, homeowners can choose the best options for their specific needs. Understanding the Role of Professional Roofing Contractors Professional roofing contractors play a vital role in home maintenance. They offer expertise that ensures roofs are safe and durable. These experts are trained to handle various roofing issues promptly and effectively. Many roofing companies also provide guidance tailored to local codes and climate. Hiring a roofing contractor provides several advantages. Their services include more than just repairs and installations. They also offer valuable advice on materials and maintenance strategies. This guidance helps in making cost-effective and informed decisions. Here are some key services offered by professional roofing contractors: Roof installation and replacement Repairs for leaks and damage Regular maintenance checks Emergency response services Specialized waterproofing solutions By choosing an experienced contractor, homeowners ensure lasting quality and reliability. Quality roofing begins with selecting the right professionals. Roof Installation: Building a Strong Foundation Roof installation is a critical service offered by professional roofing contractors. This process involves setting up a new roofing system, which is the first step in protecting your home from the elements. A successful installation lays the groundwork for a long-lasting and safe roof. The installation process typically begins with removing the existing roofing materials. Contractors then ensure the surface is clean and properly prepared. This preparation is essential to ensure the new roof adheres well and performs optimally. During installation, roofing contractors advise on the best materials suited to your environment. Options vary from asphalt shingles to metal or tile roofing. Selecting the right material can significantly enhance durability and energy efficiency. The benefits of professional roof installation include: Assurance of quality workmanship Adherence to local building codes Enhanced curb appeal and property value Long-term performance and warranty coverage A professionally installed roof not only provides shelter but also increases the overall value of your home. Trusting experts ensures your roof stands the test of time and weather. Roof Repair Services: Fixing Leaks and Damage Roof repair services play a crucial role in maintaining the safety and integrity of your home. Over time, roofs can develop issues such as leaks, damaged shingles, or structural problems. Addressing these issues promptly is essential to prevent further damage and expensive repairs. Targeted roof repair can also help you avoid premature replacement. Leaks are one of the most common problems homeowners face. They can lead to serious water damage if not repaired quickly. Professional roofing contractors have the expertise to identify and fix leaks efficiently. This often includes replacing damaged shingles or sealing areas to prevent future leaks. In addition to leaks, roofs can suffer from various types of damage. Wind storms or falling debris can cause significant harm. Contractors assess the extent of the damage and recommend necessary repairs. Their expertise ensures repairs are done right and extend the roof’s life. Common roof repair services include: Shingle replacement or patching Sealant application for leaks Structural reinforcement Gutter repair and maintenance By addressing repairs quickly, you can maintain the comfort and safety of your home. Trust in experienced roofing contractors for effective and lasting solutions. Roof Replacement: When Repairs Aren’t Enough Sometimes, repairs just won’t suffice. When a roof reaches the end of its lifespan or suffers irreparable damage, replacement becomes necessary. A full roof replacement involves removing the old materials and installing a new, robust system. Roof replacement is a significant investment but offers long-term benefits. New roofing materials enhance your home’s energy efficiency and curb appeal. With advances in roofing technology, homeowners now have a range of options for materials and styles. Choosing the right contractor for roof replacement is crucial. Experienced professionals ensure the job is done safely and efficiently. They guide you through selecting materials that match your aesthetic and budget. A well-installed roof can last decades, bringing peace of mind and protection. Key considerations for roof replacement include: Selection of durable roofing materials Matching style with home architecture Ensuring proper installation techniques Assessing warranty and lifespan options By opting for roof replacement, you invest in your home’s future, safeguarding against potential disasters and costly repairs. Roof Maintenance: Extending Your Roof’s Lifespan Regular roof maintenance plays a crucial role in prolonging your roof’s life. It involves routine checks and addressing minor issues before they escalate. Consistent maintenance helps avoid costly repairs and potential interior damage. A well-maintained roof stands resilient against harsh weather. Maintenance includes cleaning debris, inspecting for leaks, and ensuring gutters function properly. Regular attention can also prevent mold growth and structural issues. Homeowners should schedule professional maintenance services periodically. Contractors can spot issues that might be missed by the untrained eye. Here’s what a maintenance plan might cover: Cleaning and clearing debris Checking for damaged or missing shingles Inspecting flashing and sealants Evaluating gutter and drainage systems By investing in regular maintenance, homeowners can maximize roof longevity, ensuring safety and efficiency for years. Roof Inspections: Identifying Issues Early Roof inspections are essential for catching problems before they worsen. They help in identifying leaks, weak spots, or potential structural issues. Early detection can save homeowners from expensive repairs in the future. Professional roof inspections should be conducted annually. However, it’s crucial to inspect after
How To Install A Roof Ridge Vent
If you are looking for effective ways of reducing attic heat with passive ventilation, upgrading your roof’s exhaust system is one of the smartest investments you can make. A poorly ventilated attic traps heat and moisture, leading to skyrocketing summer energy bills, winter ice dams, and severe structural damage over time. Learning how to install a roof ridge vent can completely transform your home’s energy efficiency and protect your roof’s structural integrity. Whether you are building a new home or looking to install ridge vent on existing roof structures, this comprehensive guide will walk you through everything you need to know. From selecting the right materials to understanding the science of attic airflow, we will cover the entire roof vent installation process step-by-step. The Science of Attic Ventilation Before you grab your tools to install roof ridge vent materials, it is crucial to understand how and why these systems work. A ridge vent is a continuous exhaust vent installed along the very peak (the ridge) of your roof. It works in tandem with intake vents located at the eaves or soffits. Ridge Vent Benefits The core principle behind a ridge vent is thermal buoyancy—hot air rises. As hot air naturally ascends to the peak of your attic, the ridge vent allows it to escape. This continuous escape of hot air creates a vacuum that pulls fresh, cooler air in through the soffit vents. The ridge vent benefits are extensive. Not only does this system keep your attic cooler in the summer, but it also expels moisture-laden air in the winter, preventing wood rot and mold. Furthermore, there are significant ridge vent benefits for asphalt shingle longevity. By keeping the roof deck cooler, ridge vents prevent asphalt shingles from essentially baking from the inside out, doubling or even tripling their functional lifespan. Ridge Vent vs Box Vent for Attic Cooling When evaluating roof ventilation, homeowners frequently weigh a ridge vent vs box vent for attic cooling. Box vents (also known as turtle vents or louvers) are static vents installed near the ridge. While they do let hot air escape, they only ventilate the specific area immediately surrounding them, often leaving “dead zones” of trapped hot air between the vents. A ridge vent, on the other hand, runs the entire length of the roof peak. This provides a uniform, continuous exhaust path, ensuring that the entire attic space is efficiently ventilated. For passive cooling, ridge vents are universally considered superior. Mastering Attic Airflow A common mistake DIYers make when figuring out how to install a roof ridge vent is failing to balance the system. Exhaust ventilation cannot function properly without adequate intake ventilation. Balancing Attic Intake and Exhaust Airflow For a ridge vent to work as designed, you must master the art of balancing attic intake and exhaust airflow. If you have too much exhaust and not enough intake, the ridge vent can actually reverse its flow, pulling rain or snow into the attic. Ideally, your ventilation system should be perfectly balanced (50% intake and 50% exhaust), or slightly biased toward intake (e.g., 60% intake and 40% exhaust). Calculating Net Free Area for Roof Ventilation To achieve this balance, you must understand calculating net free area for roof ventilation (NFA). NFA is the total open area of a vent through which air can pass. The general rule of thumb is the 1/300 rule: you need 1 square foot of total ventilation (intake plus exhaust) for every 300 square feet of attic floor space, provided you have a vapor barrier. Without a vapor barrier, use the 1/150 rule. How Many Soffit Vents for Ridge Vent to Work? A frequent question is: how many soffit vents for ridge vent to work optimally? The answer depends entirely on your NFA calculation. Measure your attic’s square footage. Divide by 300 to get the total required NFA in square feet. Divide that number in half (50% for the ridge vent, 50% for the soffits). Convert to square inches (multiply by 144). Check the NFA rating on your chosen soffit vents to determine exactly how many individual vents or linear feet of continuous soffit vent you need to match the ridge vent’s exhaust capacity. Choosing the Right Ridge Vent Not all ridge vents are created equal. As you prepare to install ridge vent, you need to select a product that suits your climate and roof design. External Baffle Ridge Vent vs Internal Baffle When shopping for materials, you will encounter a choice between an external baffle ridge vent vs internal baffle design. External Baffles: These feature an exterior wind deflector that channels wind over the vent. This creates a Bernoulli effect—a low-pressure area that actively sucks hot air out of the attic. Internal Baffles: These have protective barriers inside the vent to block weather but lack the active “pulling” power of external deflectors. For the highest performance, especially in windy areas, external baffles are highly recommended. Best Ridge Vent for Snow and Rain Protection If you live in a region with harsh winters or driving rain, you must choose the best ridge vent for snow and rain protection. Look for shingle-over ridge vents that feature an integrated weather filter or external baffles. These designs actively deflect wind-driven rain and snow, preventing moisture from infiltrating the attic space while still allowing air to escape. Tools and Preparation Before diving into how to install roof ridge vent systems, gather the necessary tools and prioritize safety. Working on a roof is inherently dangerous, so wear non-slip shoes, use a safety harness, and never work on a wet or steep roof without professional scaffolding. Required Tools and Materials: Circular Saw: Used for cutting the roof deck. Pry Bar & Hammer: For removing old ridge caps. Chalk Line & Utility Knife: For marking and cutting shingles. Roofing Nails: You will need standard nails for the vent and specific lengths for the caps. Choosing the proper roofing nail length for ridge cap shingles is vital. Because the nail must pass through the cap
How to get insurance to pay for roof replacement
A severe storm rolls through your neighborhood, leaving behind fallen branches, debris, and, worst of all, a battered roof. As a homeowner, your first thought is likely about the cost of fixing it. A completely new roof is a massive financial investment, which is why leaning on your homeowners policy is critical. However, dealing with adjusters, deductibles, and complex policy jargon can feel overwhelming. Understanding the insurance claim process is your best defense against out-of-pocket expenses. By knowing your rights and following a strategic approach, you can navigate the red tape with confidence. This comprehensive guide will walk you through exactly how to file roof replacement insurance claim with adjuster evaluations, ensuring your home is protected and your wallet is spared. Understanding Your Roof Insurance Coverage Before climbing a ladder or calling your agent, you need to understand how insurance for roofs actually works. Homeowners policies generally cover damage caused by sudden, unexpected events—often referred to as “perils.” Sudden Damage vs. Wear and Tear One of the most common questions homeowners ask is: does insurance cover roof replacement due to age? The short answer is usually no. Standard policies are designed to cover unforeseen acts of nature, not inevitable wear and tear. If your roof has simply reached the end of its lifespan, the replacement cost falls on you. Furthermore, you must be aware of homeowners insurance policy roof age limits. Many carriers will not write a new policy—or fully cover an existing one—if the roof is over 15 to 20 years old, or they may only offer actual cash value coverage. ACV vs. RCV When reviewing your policy, look closely at how payouts are calculated. Understanding actual cash value vs replacement cost value (ACV vs. RCV) is crucial: Actual Cash Value (ACV): Pays out the value of your roof minus depreciation. If your 15-year-old roof gets destroyed, you will only receive the current, depreciated value of the old materials. Replacement Cost Value (RCV): Covers the cost to completely replace your roof with comparable materials at today’s market prices, without deducting for depreciation. Spotting the Damage and Gathering Evidence Before initiating roof insurance claims, you need solid proof. Proper documentation is the foundation of a successful claim. Knowing the Signs Look for clear signs of storm damage for insurance purposes. These include: Missing, cracked, or curled shingles Dents on roof vents, gutters, or flashing Large amounts of roofing granules in your downspouts Water stains on your interior ceilings or walls When assessing the severity, you should weigh several roof replacement urgency factors: weather damage, age, insurance requirements, and local building regulations. A fresh leak demands immediate mitigation (like a tarp) to prevent further interior damage, which your insurance company requires you to do. Your Essential Checklist Create a comprehensive file before you even call your carrier. Use this roof damage documentation checklist: Take wide-angle photos of your entire house and roof. Take close-up photos of missing shingles, dents, and yard debris. Document any interior water damage. Note the exact date and time of the storm for the wind and hail damage assessment. Gather receipts for any temporary emergency repairs. Initiating the Insurance Claim Process Once you have documented the damage, it is time to file. Promptly contacting your carrier triggers your roof damage insurance coverage. When you call your insurance provider, keep the conversation strictly to the facts. State the date of the storm, the type of damage you observe, and that you are seeking coverage under your roof replacement insurance or roof repair insurance depending on the severity. Location plays a massive role in how claims are processed. For instance, those looking into how to get insurance to pay for roof replacement Florida style will find that state building codes are incredibly strict. In Florida, if more than 25% of your roof is damaged, building codes often require a full roof replacement rather than a patch job. Knowing your local laws can force the insurance company to pay for a full replacement rather than a minor repair. Preparing for the Insurance Adjuster Roof Inspection After filing, your insurance company will send an adjuster to evaluate the damage. Preparing for insurance adjuster roof inspection is arguably the most important step in the entire process. Bring in a Professional Roofer Never meet the insurance adjuster alone. The roofing contractor role in insurance claims is to act as your advocate. An experienced roofer will get on the roof with the adjuster, point out damage the adjuster might miss, and ensure the estimating roof replacement costs for insurance is accurate and fair. Adjuster Types: Who Works for Whom? It is vital to understand the difference between a public adjuster vs insurance company adjuster. Insurance Company Adjuster: Works for the insurance carrier. Their job is to evaluate the damage, but they are also trained to protect the company’s bottom line. Public Adjuster: An independent professional you can hire to represent your interests. They take a percentage of the claim payout but can be incredibly helpful if you are dealing with a complex, high-value claim or an uncooperative insurance carrier. Navigating Costs, Deductibles, and Depreciation Money is often the most confusing part of a claim. Even with excellent roof replacement cost insurance, you will not receive a single, massive check upfront. The Deductible You must understand the impact of deductible on roof replacement. Your deductible is the amount you are responsible for paying before insurance kicks in. If your roof costs $15,000 to replace and your deductible is $2,000, the insurance company will only pay $13,000. Be cautious of contractors who offer to “waive” your deductible, as this is considered insurance fraud in most states. The Payout Process Insurance companies usually pay out RCV claims in two parts, utilizing the recoverable depreciation roof claim process: First Check (ACV Check): You will receive a check for the actual cash value of the roof, minus your deductible. You use this to start the job. Second Check (Recoverable Depreciation): Once the roofing contractor finishes the job
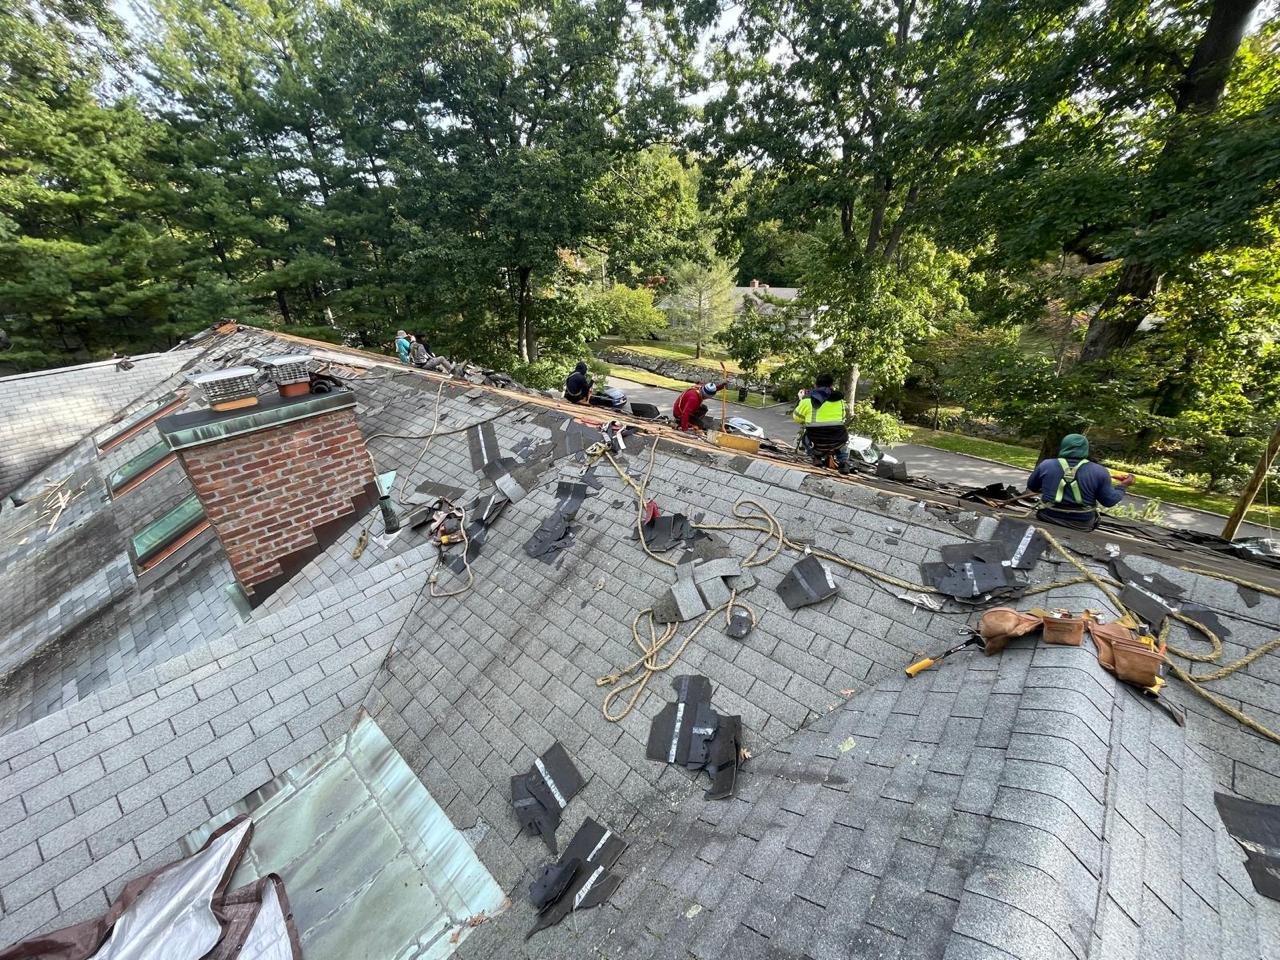
Roof Installation Project in Scarsdale, NY by American Star Contractor Corp
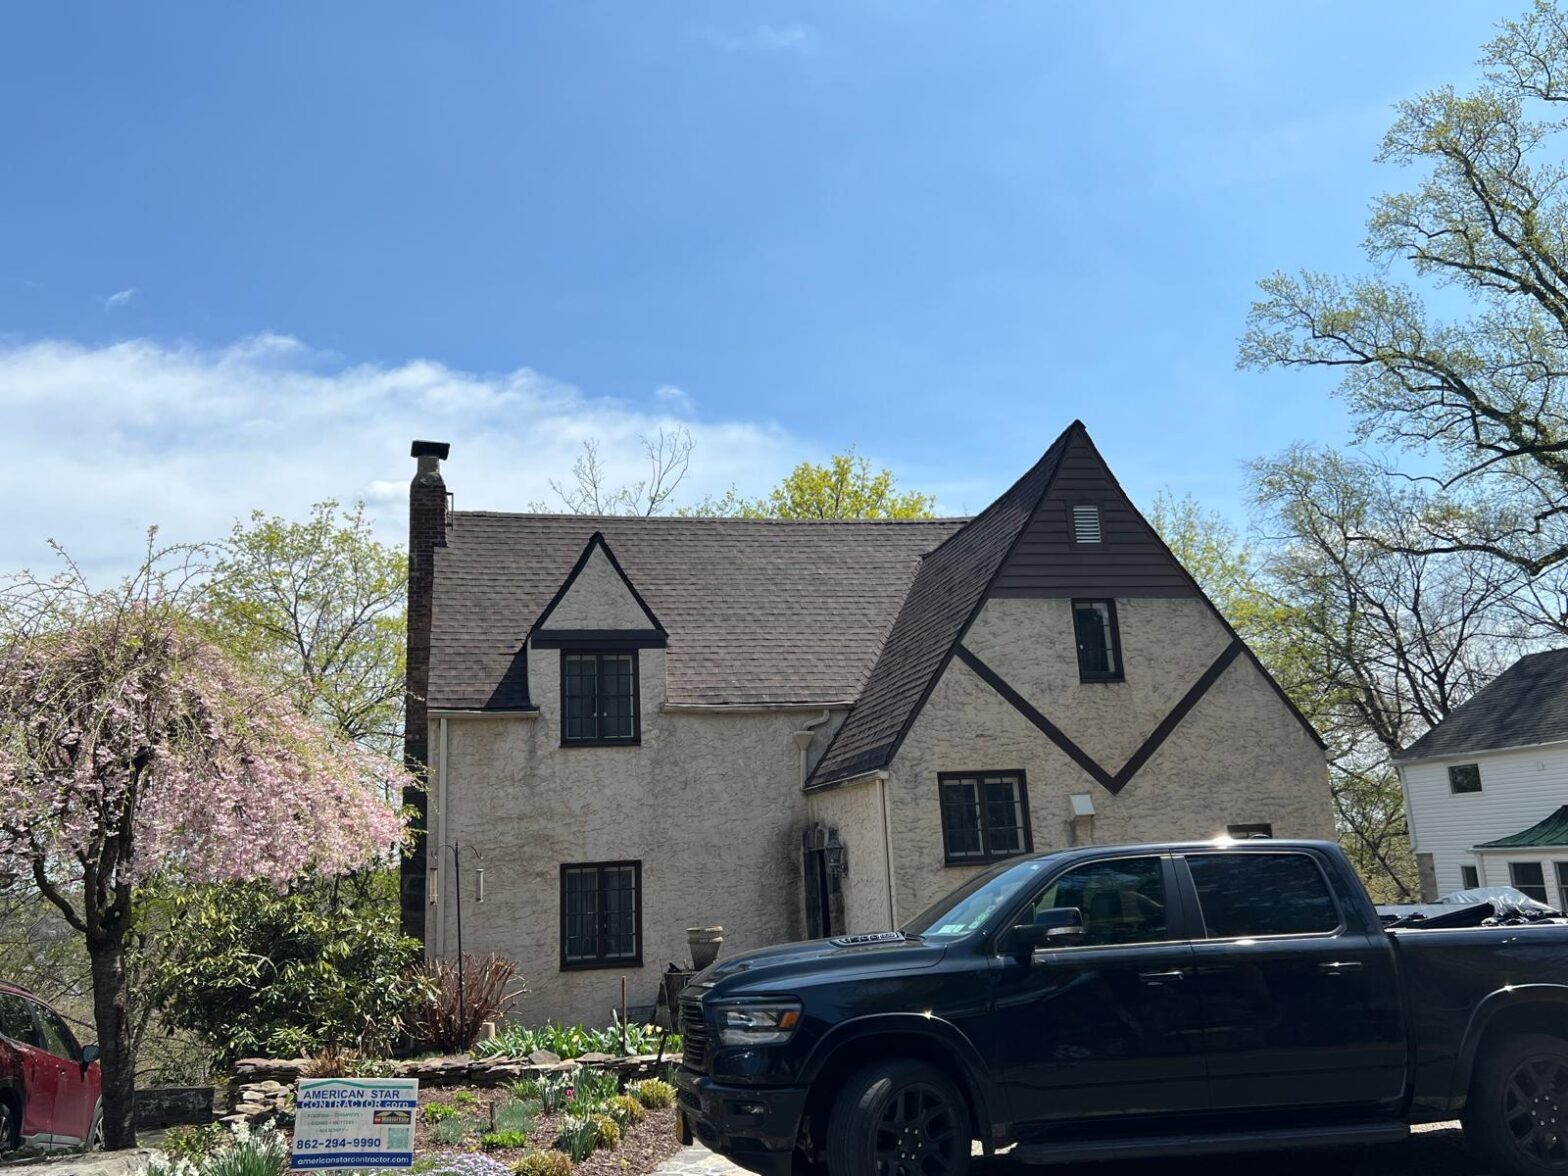
American Star Contractor Corp recently finished a professional roof installation job in Scarsdale, offering the homeowner a durable, weatherproof roofing system which will offer long-lasting protection and performance. The project included a full roof installation with the use of quality roofing materials and waterproofing systems as well as upgraded ventilation materials and systems to help keep the property protects from the hard New York weather. Scarsdale homes are subjected to lots of rain, snow, ice cover, wind, and seasonal temperature fluctuations throughout the year. As a roof ages, it may age and weaken over time with leaks, broken shingles, moisture and structural decay which will affect the safety and efficiency of the home. The objective of this roofing installation was to install a secure, energy efficient and dependable roofing system that would be long lasting and boost the overall appearance and worth of the property. Detailed Roof Inspection and Planning The experienced roofing professionals at American Star Contractor Corp. will first inspect your roofing substrate to ensure that it is ready before installing the roof. A full roof inspection and structural review was done. Our roofing professionals thoroughly inspected the current roof surface, roof structure, ventilation and flashing, and roof drainage to determine if there were any underlying problems that would require attention prior to installation. As part of this inspection, we noted areas of aged roofing material, worn flashing areas and areas with long term weathering. Our team can design a roofing system that is optimized for the structure’s requirements and future objectives through a comprehensive evaluation. Proper planning is also an important aspect of roofing installation, as it can help to avoid any potential leaks, optimize the efficiency of ventilation and ensure that the roofing system is reliable in all weather conditions. Removal of Old Roofing Materials Our team thoroughly cleaned up the existing roofing material and conducted a thorough assessment of the roof decking beneath it, preparing the site for the installation of the new roofing system.Our team carefully cleaned up the existing roofing material and inspected the roof decking beneath to prepare for the installation of the new roofing system. It’s crucial to remove the old components of the roofing system that have become damaged since they can impact the performance and longevity of the new roof. After the existing materials had been removed we conducted a comprehensive assessment of the roof deck surface to evaluate for water damage, soft spots and structural deterioration. Any repairs that were needed were done to ensure a sturdier and more stable base to install the new roof. Professional Roof Installation Process Our team prepared the roof structure and then installed a new high-performance roofing system with a long lifespan, high energy efficiency, and excellent durability to provide the roof with reliable protection. High quality roofing materials were used that will not absorb moisture, be damaged by the sun, heat or harsh weather typical of Westchester County. The roof installation project comprised of: Installation of roof preparation and waterproof underlayment. New roofing materials to be installed. Installing chimney, vent or roof penetrations under flashing. Ventilation enhancements for ridge ventilation to ensure an adequate air flow. The sealing and edge protection of waterproof materials. Last inspection and quality control of roof. The workmanship and attention given to detail for every stage of the project was professionally completed. Installing flashing, venting and waterproofing a roof is a vital part of a roof that will last. Increased Protection and Energy Efficiency The right roofing company can do more than just beautify a house. It is also essential for the structure’s protection against water damage, mold formation, energy loss and deterioration due to weather conditions. This new installation of a roof in Scarsdale was designed to offer: Long-term leak protection Better attic air circulation and air flow Better attic air circulation and air flow Increased ability to withstand heavy rain and snow. The use of better energy efficiency and insulation materials. A more robust change of seasons durability.Better seasonal durability. Reduced maintenance and repair needs The upgraded roofing system provides a more robust and durable structure, ensuring the homeowner enjoys enhanced protection and a better long-term investment. Built for Scarsdale Weather Conditions A roofing system in Westchester County must be able to cope with the challenging weather conditions all year round. Roofing materials may be stressed during snow accumulation, freeze-thaw conditions, heat in the summer, and by severe storms. American Star Contractor Corp, as a roofing contractor, has roofing systems that are installed specifically for New York’s climate so that they will be durable and perform for a long time. Our roofing experts are dedicated to quality installation methods, high quality materials and complete waterproofing solutions, all of which help to increase the life of the roof and to minimize future maintenance issues. The reasons why homeowners opt for American Star Contractor Corp American Star Contractor Corp is a reputable roofing and exterior home remodeling firm that can be counted upon by homeowners in Scarsdale and the surrounding areas in New York. The company is mainly involved with Roof Installation, Roof Replacement, Chimney Services, Siding Installation, Gutters, Skylights, and Exterior Home Improvement. We’re the American Star Contractor Corp because our: Experienced roofing professionals High-quality roofing materials A detailed project planning and inspections. Well made work and service to customers Designed for durability, both roofing and exterior solutions last long. All roofing jobs are finished with a focus on structural strength, weather security and client pleasure. Whether you’re in search of roof installation solutions in Scarsdale, NY, American Star Contractor Corp offers reliable roofing remedies for your home to last a lifetime.
Types of Commercial Roofing Systems
A commercial roof is often the most expensive maintenance item a building owner faces, yet it rarely gets attention until a leak threatens inventory. Viewing this overhead structure as a long-term asset rather than a ticking repair clock fundamentally changes how you manage facility budgets. According to modern building standards, most commercial roof styles utilize “low-slope” engineering—a slight pitch designed strictly for water drainage, unlike residential steep-slopes or truly flat, water-pooling surfaces. Looking down from a downtown high-rise reveals a patchwork of black and white rooftops across the skyline. These contrasting colors represent fundamentally different types of commercial roofing systems. White materials leverage the “Albedo effect,” reflecting solar heat like a light-colored t-shirt to dramatically lower utility bills. Installers like American Star Contractor emphasize that matching this reflectivity to your specific climate is a critical environmental strategy. Selecting the best roofing systems requires evaluating the total cost of ownership instead of just the initial price tag. Industry data demonstrates that choosing the appropriate material creates a massive 20-year return on investment difference by extending the asset lifecycle and minimizing daily energy demands. Cooling Your Building with Pool Liner Tech: The TPO and PVC Advantage Picture a heavy-duty white pool liner stretched tightly across your building. That is essentially Thermoplastic Polyolefin (TPO), one of today’s leading types of flat commercial roofing systems. Since white surfaces naturally reflect the sun’s heat, these “cool roofs” drastically lower summer air conditioning bills. Furthermore, instead of relying on standard adhesives, installers use hot air to melt the overlapping sheets together. This heat-welding process fuses the plastic into a continuous, watertight bond that is structurally superior to glued seams, which inevitably peel apart over time. However, not all bright white plastics serve the exact same purpose. If you manage a restaurant with exhaust vents, animal fat and cooking oils will quickly eat through standard TPO. That is where Polyvinyl Chloride (PVC) becomes mandatory. To understand which material fits your budget, compare these factors: Grease Defense: Superior PVC roofing chemical resistance easily withstands the harsh oils that destroy other roofs. Weld Strength: Both materials use ultra-durable heat-welding, entirely avoiding vulnerable glued overlaps. Price: Standard thermoplastic polyolefin membrane benefits come with a lower upfront cost, making it perfect for basic dry warehouses. Weighing TPO vs EPDM roofing or deciding if a PVC upgrade is necessary depends entirely on your specific business environment. While these white plastics dominate hot, sun-baked regions, other materials excel in freezing weather. The Industrial Inner Tube: Why EPDM Rubber Thrives in Cold Climates While white plastics dominate the south, property owners in freezing climates often turn to a classic solution: Ethylene Propylene Diene Terpolymer, or EPDM. Think of EPDM roofing as a massive, industrial-grade rubber inner tube stretched across your building. When winter brings brutal freeze-thaw cycles, structures naturally shift and change size. This physical movement, known as thermal expansion, frequently snaps stiffer plastics. By contrast, this synthetic rubber remains entirely flexible. It forms the cornerstone of almost any practical commercial flat roof maintenance guide because its elasticity allows it to absorb impacts from heavy hail without puncturing or cracking. Evaluating the different types of flat commercial roofing systems requires understanding specific climate trade-offs. Because standard EPDM is jet black, it absorbs intense heat like a dark t-shirt in the sun. This heat absorption helps melt winter snow, but constant summer sunlight eventually causes UV degradation, slowly drying out the rubber over decades. Consider this regional breakdown: Northern Climates: The dark surface naturally melts ice dams, while the rubber easily survives sub-zero temperatures. Southern Climates: The intense heat absorption heavily spikes summer cooling costs. If replacing a membrane every twenty years sounds exhausting, metal roofing presents a highly durable alternative. Investing in a 50-Year Asset: When Metal Roofing Makes Sense Looking past the initial sticker shock is essential when reading any comprehensive roofing materials guide. While the industrial metal roofing cost per square foot runs substantially higher than rubber membranes upfront, the long-term ROI paints a completely different financial picture. A standard membrane needs replacing every twenty years, whereas a metal system easily protects your asset for half a century. Additionally, metal provides unmatched fire resistance, frequently resulting in significant, long-term insurance premium discounts. When exploring commercial roofing types, you will encounter structural metal, which supports itself across open framing, and architectural metal, which requires a solid wooden deck underneath. For either application, “standing seam” panels remain the most reliable choice. Unlike cheap corrugated metal screwed directly through the face, standing seam systems hide their fasteners under raised interlocking joints. This invisible fastening lets expanding metal panels glide smoothly in the heat without tearing holes. This raised design perfectly illustrates the functional difference between hydrokinetic and hydrostatic metal roofing types. Flat membrane roofs are hydrostatic—acting like a sealed swimming pool liner built to hold sitting water. Conversely, metal roofs are hydrokinetic, relying on gravity and pitch to shed water quickly. If your building has absolutely zero slope, a multi-ply system offers the necessary watertight seal. The Layered Cake Strategy: Why Multi-Ply Systems Stop Leaks Before They Start When evaluating different types of commercial roofing systems for completely flat buildings, creating a watertight seal is paramount. Built-Up Roofing (BUR) relies on a “layered cake” approach, alternating reinforcing fabrics—called asphalt plies—with hot liquid tar. This creates intentional redundancy; multiple fused layers ensure a minor surface scratch doesn’t instantly become a catastrophic interior leak that disrupts your business. Protecting this thick barrier requires a functional topcoat of crushed gravel. Since commercial roofs inevitably become walkways for HVAC and maintenance crews, this stone armor defends the underlying layers against heavy boots while reflecting asphalt-baking UV rays. When asking how long does a built-up roof last, facility managers can typically expect twenty to thirty years of reliable, heavy-duty protection. Conducting a practical roofing system comparison often comes down to modified bitumen vs built-up roofing. Modified bitumen modernizes this layered approach by pre-manufacturing the asphalt into easy-to-roll sheets, significantly speeding up installation and reducing strong on-site odors. However, if